
As I shared earlier, Scott and I decided to redo the flooring on the entire first floor. Even though there are already hardwoods in the living room and entry, they are in rough shape, and we’d like the option to have all the flooring match. On the day we closed, Lumber Liquidator’s was having a crazy sale, which allowed us to get a set of beautiful hardwoods for the entire first floor. (Wanna see what they look like in action? Check out this post from a blogger who installed them in her place–beautiful!)
The floors are engineered hardwoods-not laminate, but rather a real wood layer on top of several other layers of wood (vs. one solid piece). This is supposed to make the floor more durable and water-resistant, which is important when installing them in kitchens, like we are. Another HUGE upside is that they are floating floors, which means you can lay them down on all kinds of surfaces with little problem.
While we had originally planned to tear out the hardwoods, I melted with relief when I found we could actually just install right over them. Score one for the “simple solutions” column! Now the kitchen, well… That’s a tougher story.
As I shared last post, the kitchen floor was supposed to be simple. Tear out the plywood currently covered in thin set. Underneath it would be subfloor which we’d need to do some minor repair work on, but all in all, a simple process, right?
WRONG!
Problem #1: The wood floor was screwed down. There are a lot of different ways to attach plywood to a subfloor, and while screws aren’t the hardest to remove, they certainly aren’t the easiest. When we started taking out the transitions, we noticed that the previous owners had installed screws EVERYWHERE. They were both visible and hidden by the thin set, so cutting the floor out was no longer an option (you might hit a screw). So, we had resigned ourselves to tearing out the floor, patch by patch with muscle–we’d find the screws when the wood wouldn’t come up!
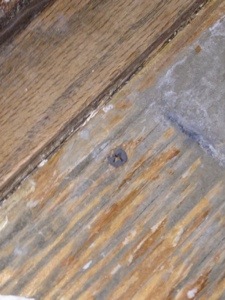
This little guy was a MAJOR PAIN
Problem # 2: They screwed it right in to the linoleum… ASBESTOS linoleum… We tried this for about .3 seconds until we tore up our first patch… and found linoleum stuck to the bottom. And not just any linoleum my friends, asbestos linoleum. See, typically this cancer-causing material is fine to have in a home (and is common in homes built pre-1970) so long as you don’t disturb it (once it’s in “dust” form, the particles become airborne and then they are dangerous). As a result most homeowners either live with it or eventually just cover it up. Except, um, you’re supposed to cover it up CORRECTLY! So that future homeowners like us don’t disturb it with a simple task like plywood removal! (In case you’re wondering: they should have done another clean layer between the linoleum and plywood, but that would’ve cost more money, which is why I’m assuming they skimped.) Luckily Scott sent me a pic and was able to stop immediately. But then this left us with another problem: how the HECK do we get rid of that thin set?

That is what asbestos linoleum looks like, in case you were wondering. Or if you ever need that information (visual trivia clue?)

And that’s what it looks like disturbed–stuck to plywood you want to rip out
Problem #3: Scraping out thin set it really hard. I researched a lot of different methods (all of which began with: “If it were me, I’d just take out the plywood!”. Duh, guys) and found this was typically done two ways: by Scraping or sanding. Since sanding was super expensive and messy, we gave scraping a try. Borrowing a friend’s reciprocating saw, we bought a chisel blade and went to town! Except we didn’t, because it didn’t work. We either couldn’t get the blade to go in deep enough (to actually work) or it went in too deep and was chipping out plywood. PLUS, the blade was 4 inches wide and we had almost 300 sq ft of thin set to tackle. Sigh.

So.Much.Thin.Set.
Ultimate Solution: By this point, I had resigned myself to renting a floor grinder and giving that a shot. It would be a couple hundred dollars for the rental and the blade, and it would be a NIGHTMARE to clean up, but I was stuck. Luckily, family friend Jim was headed over that day to look at the shower. Even though he’s not exactly a “floor” expert, he took a look, thought about it for a bit (it’s fun to watch Jim’s “wheels” turn :)) and had a solution! He was having a flooring guy come out to do some work on leveling his floors, and figured he could come on over and do ours too.
Seriously? Problem solved-just like that.
The process involves self-leveling compound which some people can DIY in small spaces, but with a big project like ours (several vents, door frames, the existing thin set and such a big space) it’s really a job better left to the experts (or at least, NOT us). They are doing the leveling today and not in recent history have I been SO HAPPY to leave last night and know that was the last time I’d have to see and walk all over that crunchy mess!
This was a great lesson for us to learn. I feel great that we exhausted every option before having to call the experts in, and by doing most of the prep work ourselves (tearing out the tile, leveling the biggest bumps) we still saved several hundred dollars over just calling someone to do the whole project. I felt vindicated that on paper, all of our ideas were right and the correct order of operations-it gave me a lot of confidence for future problems that may come our way.
Since Jim knows the guy and is kind of tacking it on to work he’s already out here to do, we’re saving lots of money than if we’d just called a floor guy ourselves. So all in all, we’re getting the floors done FOR US for little more than it would’ve cost to rent the grinder. I call that a WIN!
Other house projects continue: we’ve moved on to painting the upstairs–can’t wait to share the before and after pics when finished!

You are a WARRIOR. Keep it up!